Replacing knob-and-tube wiring in San Francisco isn’t just “new wires in old walls.” It’s a permitted electrical alteration in a city where inspectors see every variety of 1900s-era construction, remodel layers, and creative past DIY. The inspection process is where your rewire becomes legally approved, safe to energize, and documented as compliant—or where it stalls because something doesn’t add up.
San Francisco’s electrical inspections run through DBI’s Electrical Inspection Division (EID). The local San Francisco Electrical Code spells out the inspection structure and—importantly—ties energizing work to the Certificate to Connect Current (“Green Tag”) concept. The code explicitly says it is unlawful to energize an electrical installation without a Green Tag and that the Green Tag authorizes the owner to energize the permitted installation.
In 2026, there’s an additional wrinkle: California’s next code cycle becomes effective January 1, 2026. If you’re pulling permits around that date, you want your contractor thinking in “current edition” terms, not habits from the prior cycle. California’s Building Standards Commission materials state an effective date of January 1, 2026 for the new code cycle.
This guide is designed to do two things:
- Demystify what SF inspectors usually check at pre-cover (rough) and final after a rewire (especially knob-and-tube replacement).
- Show you how to avoid red flags that trigger corrections, re-inspections, delays, and budget creep—without overbuilding or guesswork.
How SF inspections are structured (what the City requires, in plain English)
Required inspections: pre-cover and final (plus “other” as needed)
San Francisco Electrical Code section 89.127 lists required inspections, including:
- Pre-Cover Inspection (before you cover or conceal wiring)
- Final Inspection (after completion, with demonstration of satisfactory operation)
- Other Inspection as may be required
That’s the backbone. In real life, you’ll often hear these called “rough” and “final.”
The “Green Tag” inspection concept (energizing is not casual)
The same SF code section states:
- It’s unlawful to energize an electrical installation without a Certificate to Connect Current (Green Tag).
- The Green Tag authorizes the owner to energize the permitted installation.
Also practical detail: the permit holder must notify EID when the installation is ready, and the code notes notification at least 24 hours before inspection is desired.
Inspection types you may see listed in SF materials
A DBI small business inspections checklist (used to help identify required inspections) lists EID inspection types that may be required, including rough inspections (underground/ceilings/wall), Green Tag inspection, and final.
SF also publishes inspection scheduling codes that explicitly include:
- 100 – Rough cover/re-inspection
- 103 – Green tag – Energize service
- 111 – Concrete encased electrode
…and others.
Even if you never call the “voice system,” those codes reflect how EID thinks about the workflow.
The inspector’s mindset: what they’re really trying to confirm
An SF electrical inspector isn’t there to judge your brand of breaker or whether your cable runs are “pretty.” They’re trying to confirm:
- Safety: No shock hazards, no fire hazards, no energized metal parts, no undersized conductors, no damaged insulation, no open splices.
- Code compliance: Work aligns with the adopted electrical code + local SF amendments, and the installation matches the permitted scope.
- Durability: The system will remain safe after years of vibration, thermal cycling, small leaks, future remodeling, and homeowners hanging pictures everywhere.
- Energization and sign-off readiness: If the work requires energizing approvals, the inspector needs a clean path to approve it in accordance with SF’s Green Tag framework.
If you build the project to match those four priorities, inspections become predictable.
What SF inspectors typically check at pre-cover (rough) after a rewire
Rough inspection is where most “red flags” show up because everything is visible. Once drywall goes up, proving compliance gets harder and corrections get expensive.
Below are the most common categories inspectors focus on during knob-and-tube rewires in older SF homes.
1) Permit scope and “what exactly was changed”
What they check
- Work matches the permit scope: areas rewired, circuits added, panel work included (or not), devices relocated, new dedicated circuits, etc.
- No major scope creep that should have triggered an updated permit set.
Why it matters
Inspections are not just “did you wire it safely”—they’re “did you wire what you were authorized to wire.”
Red flags
- “We moved the panel while we were here” (without the correct paperwork/plan).
- New subpanel appears that wasn’t part of scope.
- Hidden service changes (meter/main modifications) performed like a side quest.
How to avoid it
- Keep a one-page “scope sheet” on site: circuits added, areas rewired, and any service/panel work.
- If scope changes, handle it before inspection day—don’t hope it slides.
2) Knob-and-tube: de-energization, abandonment, and clean separation
K&T replacement is common in SF. Inspectors typically don’t panic at seeing old work in an old house—but they do need certainty that it’s made safe.
What inspectors want to see
- Old K&T conductors are fully de-energized and cannot accidentally be re-energized later.
- No open “mystery” conductors floating in walls or attics.
- Transitions from old circuits to new circuits are handled with proper methods (splices in boxes, accessible junctions, correct fittings).
Common K&T rewire red flags
- K&T left connected “temporarily,” then forgotten.
- Cut-and-capped conductors with no junction box.
- Splices hidden behind plaster or buried in insulation.
- New wiring tied into questionable old splices to “save time.”
Inspection-friendly best practices
- Treat every abandoned conductor like it could be energized until verified otherwise.
- Keep all transitions in listed junction boxes with covers, and keep those junctions accessible.
- If full physical removal isn’t possible (often true in plaster walls), make abandonment unambiguous: disconnect at source, terminate properly, document.
3) Cable routing, support, and physical protection (the “future drywall screw” test)
Inspectors spend real time on this because it’s a predictor of long-term failures.
What they check
- Proper support and fastening of cables (no hanging bundles).
- No jacket damage from over-stapling.
- Protection at framing penetrations: holes drilled at safe setback, nail plates where needed.
- Protection where cables are subject to physical damage.
Red flags
- Over-driven staples compressing the cable jacket.
- Cables too close to stud faces with no nail plates.
- Cables resting on sharp metal edges without proper fittings.
- Excessive bundling in tight spaces that suggests heat and derating concerns.
How to avoid it
- Make cable routes boring and consistent.
- Use nail plates generously whenever setback depth looks borderline.
- Keep bundles organized and avoid “rat nests” in bays and at panels.
4) Boxes, box fill, and “everything in a box”
If there’s one universal correction category, it’s boxes.
What they check
- Every splice is in a listed electrical box.
- Boxes remain accessible (not planned to be buried behind tile/cabinetry with no access).
- Correct connectors/clamps at entries.
- Box fill is reasonable given conductor count, device yokes, grounds, and internal clamps.
Typical red flags
- Splices outside a box (“we’ll box it later”).
- Overfilled multi-gang switch boxes (common in rewires because modern switching is more complex).
- Missing connectors where cable enters metal boxes.
- Cable sheathing stripped back too far; conductor insulation nicked.
How to avoid it
- Upsize boxes early—deep boxes, larger multi-gang boxes, extension rings where appropriate.
- Plan switching: 3-way/4-way, dimmers, smart switches, fan controls often need extra volume.
- Keep sheathing into the box properly and use correct fittings for the box type.
5) Grounding and bonding (where inspectors get strict fast)
In older homes, grounding/bonding errors are a major safety hazard. Inspectors will be alert.
What they check
- Correct grounding electrode conductor setup (when applicable to scope).
- Correct bonding at service equipment (and isolation at subpanels).
- Grounding continuity to metal boxes and devices.
- No illegal neutral-ground connections downstream.
Red flags
- Neutrals and grounds mixed in subpanels.
- Missing bonding jumpers where metal raceways or fittings require them.
- Multiple neutrals under one terminal where not listed.
- “Bootleg grounds” (neutral tied to ground at receptacles).
How to avoid it
- Follow manufacturer instructions for panels and terminals.
- Keep grounding conductors long enough, continuous, and neatly landed.
- Treat neutral/ground separation as a design rule, not a suggestion.
6) Branch circuit design: conductor sizing, dedicated circuits, MWBCs, and “load logic”
A rewire should not recreate 1920 wiring logic in 2026.
What inspectors often notice
- Conductor size matches breaker rating (this is non-negotiable).
- Dedicated circuits exist for typical modern loads (kitchen, laundry, bath, HVAC, EV charging if present).
- Multi-wire branch circuits (MWBCs) are correctly configured: shared neutral, proper handle-tie/common-trip requirements, and coherent neutral routing.
Red flags
- 20A breaker feeding 14 AWG conductors.
- Shared neutrals without proper handle ties/common trip.
- Borrowed neutrals across circuits (creates unpredictable return paths and nuisance trips).
- Kitchen/laundry loads “blended” into general lighting circuits.
How to avoid it
- Build a circuit schedule from the floor plan before pulling wire.
- Keep one clear purpose per circuit whenever possible.
- If you use MWBCs, do it intentionally with correct protection and routing.
7) AFCI and GFCI strategy (the protection devices that trigger the most corrections)
In 2026, inspectors expect modern shock/arc protection to be applied correctly and consistently.
What they check
- Required GFCI protection in typical wet/outdoor/utility areas.
- Required AFCI protection in typical living/habitable areas.
- Correct method: breaker-based vs device-based, and correct wiring (especially line/load on GFCIs).
- Compatibility with MWBCs and shared neutrals.
Red flags
- Missing protection where clearly required.
- GFCI receptacles wired incorrectly so downstream outlets aren’t protected.
- AFCI breakers installed but neutrals mixed across circuits.
- “Fixing” nuisance tripping by swapping breaker types without addressing the wiring fault.
How to avoid it
- Decide early: where protection will be provided and how.
- Keep neutrals disciplined—label them, route them cleanly, don’t mix.
- Test protection devices before final; don’t wait until inspection day.
8) Fireblocking, penetrations, and old-house realities
In SF, electrical work often opens up walls/ceilings and creates penetrations through plates and blocks. That can become a fire-spread issue if not restored.
What inspectors may pay attention to
- Penetrations through top plates and framing are handled appropriately (and restored/sealed where required by the broader project scope).
- Vertical chases created by drilling/boring aren’t left as open pathways.
Red flags
- Large holes at top plates into attic cavities with no restoration plan.
- Open vertical cavities in balloon framing that were “opened up” and left unaddressed.
How to avoid it
- Treat fireblocking restoration as part of the rewire scope on older homes.
- Coordinate with building inspection requirements when walls/ceilings are opened.
9) Workmanship signals that make inspectors look closer (even if “technically allowed”)
Inspectors are human. Certain patterns often correlate with future failures, so they trigger extra scrutiny.
Signals that usually help
- Consistent routing, clean supports, correct fittings.
- Readable organization in panels and junction boxes.
- Clear labeling, no mystery circuits.
- No improvisation with non-listed parts.
Signals that raise eyebrows
- Spaghetti bundles, random splices, inconsistent methods room-to-room.
- Excessive use of “shortcuts” that are legal but sloppy.
- Device boxes jammed to the limit everywhere.
- Mixed conductor types and odd transitions with no clear reason.
The rough inspection “pass-ready” walkthrough (what a clean job looks like)
If you want an easy mental model, a pass-ready rough rewire typically has:
- Every splice in a box with an accessible cover.
- Boxes solidly mounted and at correct depth for finished walls.
- Cables supported at consistent intervals; no crushed jackets.
- Nail plates wherever the stud-face setback is questionable.
- Neutrals and grounds organized (especially in multi-gang switch boxes).
- AFCI/GFCI plan already decided (not “we’ll figure it out at final”).
- Old K&T made unambiguously dead and separated from new wiring.
That’s what reduces inspector questions. And inspector questions are where red flags are born.
What SF inspectors typically check at final after a rewire
Final inspection is where projects unexpectedly fail because people treat it like “just put plates on.” Inspectors at final are usually verifying three big things:
- Safety and protection devices function
- Panel correctness and labeling
- No concealed violations are implied by the finished condition
Here’s what that translates to.
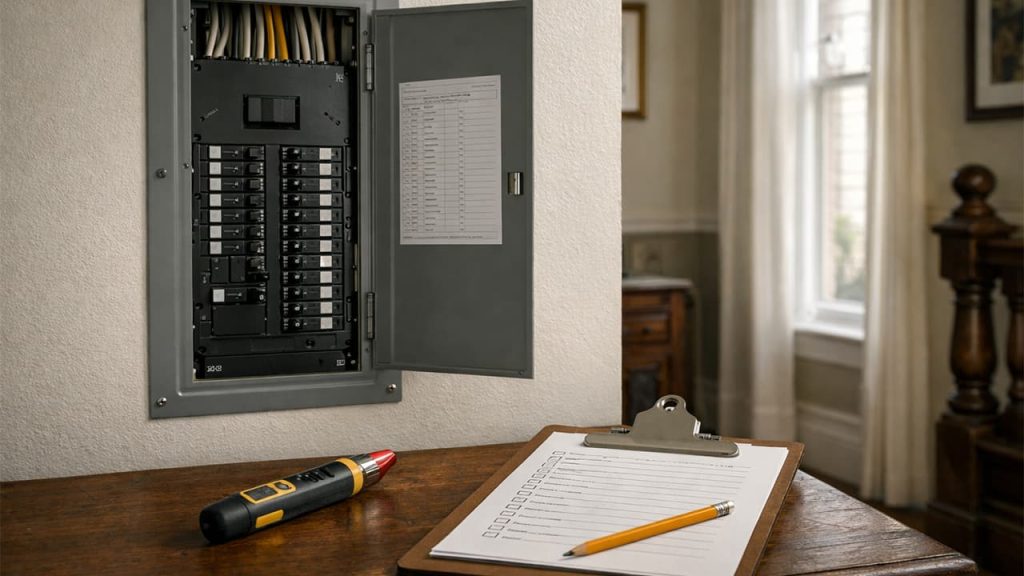
1) Panelboard and service equipment: labeling, blanks, clearances, and termination quality
What they check
- Panel directory is complete and accurate (not vague).
- No missing filler plates / open spaces.
- Working clearance in front of panel is maintained (people accidentally violate this with remodel changes).
- Breakers match circuit design and conductor sizing.
Red flags
- Labels like “Lights” or “Outlets” for half the house.
- Missing filler plates.
- Double-tapped breakers where not listed for it.
- Conductors with messy terminations suggesting improper stripping or crowding.
How to avoid it
- Create a panel schedule while roughing in circuits, not at the end.
- Use room-by-room naming: “Kitchen counter GFCI (north wall),” “Bath receptacles,” “Bedroom 2 lights,” etc.
- Ensure working clearance isn’t compromised by newly installed shelves, cabinets, or storage.
2) Devices: polarity, grounding, tamper resistance, weather resistance, box depth
What they check
- Devices are installed securely and flush; no exposed conductor.
- Correct polarity and grounding.
- Required tamper-resistant receptacles (typical in dwelling units).
- Exterior receptacles have appropriate covers; wet locations handled correctly.
- Boxes and devices are properly supported and not “floating” in plaster.
Red flags
- Loose receptacles that move when plugged into.
- Crooked devices because box depth was wrong (common in plaster walls).
- Exterior outlets without proper in-use style protection where required.
How to avoid it
- Use box extension rings or correct depth boxes in plaster.
- Replace worn device straps; don’t reuse damaged yokes.
- Treat exterior/outdoor installs as their own category of durability.
3) AFCI/GFCI functional tests (inspectors love the test button)
Expect inspectors to press buttons and verify reset.
Red flags
- GFCIs that won’t reset.
- Downstream outlets not actually protected because line/load was reversed.
- AFCI nuisance tripping due to mixed neutrals or shared neutral mistakes.
How to avoid it
- Test every protection device before inspection day.
- Do a simple “map”: which breaker/device protects which outlets.
- If an AFCI trips, fix the cause—don’t “solve” it by downgrading protection.
4) Lighting and switching: correct controls, multi-way switching, fan-rated boxes, dimmer compatibility
This is where rewires in older homes get messy because modern lighting expectations (and fixtures) are different.
What they check
- Proper switch function (including 3-way/4-way where present).
- Proper fan support if ceiling fans are installed (fan-rated boxes where required).
- No exposed conductors at fixtures.
- Correct grounding at metal fixtures and boxes.
Red flags
- Multi-way switching wired incorrectly so lights behave unpredictably.
- Ceiling fan hung from a box that isn’t designed for fan load.
- Fixture connections crammed into shallow boxes.
How to avoid it
- Plan lighting zones and switching early (especially in stairways and hallways).
- Use fan-rated boxes for fans—don’t gamble.
- Don’t cram fixture connections; use appropriately sized boxes.
5) Accessibility: junction boxes and equipment must remain accessible after finish work
SF’s code framework includes strong language about inspection before concealment and the unlawfulness of concealing work that hasn’t been inspected.
Red flags
- A junction box “disappears” behind a new cabinet, mirror, backsplash, or built-in.
- Access requires removing finished materials.
How to avoid it
- Do a final “access audit” before cabinets and tile go in.
- If something must be in a concealed space, design it so it’s not a junction point (or create a code-compliant access panel as needed for the overall project).
The SF inspection schedule reality: rough, Green Tag, final (and the codes behind it)
SF’s own published inspection codes are a useful lens:
- 100 — Rough cover/re-inspection
- 103 — Green tag – Energize service
- 111 — Concrete encased electrode
…and completion codes like 301/302.
You don’t need to memorize those, but they remind you that SF treats “rough,” “energization approval,” and “final completion” as distinct milestones.
A DBI checklist also lists rough categories and Green Tag + final as potential required inspections.
The “red flags” that most often cause SF rewire inspection failures (and how to prevent them)
Below is a practical list of issues that frequently trigger corrections, along with what the inspector likely infers and what to do.
Red Flag 1: Unclear knob-and-tube abandonment
Inspector’s concern: hidden energized wiring, future re-energization risk, undocumented splices.
Prevent it: disconnect at source, terminate in boxes, keep accessible, document what’s abandoned.
Red Flag 2: Mixed neutrals / MWBC confusion
Concern: unsafe return paths, AFCI problems, unpredictable behavior.
Prevent it: strict neutral discipline; correct handle ties/common trip where required; consistent routing.
Red Flag 3: Overfilled boxes and tight device cavities
Concern: overheating risk, damaged insulation, poor workmanship.
Prevent it: larger/deeper boxes; fewer conductors per box; extension rings where appropriate.
Red Flag 4: Missing physical protection (nail plates, shallow holes)
Concern: future screw/nail hits—very common post-remodel hazard.
Prevent it: nail plates and proper drilling; reroute if needed.
Red Flag 5: Panel directory is vague or inaccurate
Concern: dangerous troubleshooting later, low quality control.
Prevent it: room-level labeling; verify by testing and mapping.
Red Flag 6: GFCI/AFCI protection inconsistent or miswired
Concern: missing life-safety protection, nuisance tripping, confusion.
Prevent it: plan protection early; test every device/breaker functionally.
Red Flag 7: “We’ll fix that later” site condition at inspection
Concern: if it’s not complete, it’s not inspectable.
Prevent it: schedule inspection only when truly ready; SF code anticipates formal notification when ready for inspection.
2026 code-cycle awareness: why your permit date matters
California code cycles can create “gray-zone confusion” when projects straddle an effective date.
California Building Standards Commission materials about state amendments note an effective date of January 1, 2026.
Practical takeaway for homeowners
- Ask: “Which code edition is this permit under?”
- If your project is near a code transition, verify protection requirements and any service equipment rules that changed.
You’re not trying to argue code sections—you’re trying to avoid building something that will be evaluated under a different rulebook than your team assumed.
A homeowner-friendly “Inspection Readiness” checklist (zero electrical jargon required)
Before pre-cover (rough)
- ✅ All splices are inside boxes with covers.
- ✅ Boxes are mounted solidly and won’t shift.
- ✅ Cables are supported and protected (nail plates where needed).
- ✅ Old knob-and-tube is clearly disconnected and made safe.
- ✅ There’s a clear plan for where AFCI/GFCI protection will be provided.
- ✅ Work area is clean enough that an inspector can actually see the installation.
Before final
- ✅ Every outlet and switch is installed, tight, and has a cover plate.
- ✅ GFCI/AFCI devices pass a test (test button + reset).
- ✅ Panel directory is complete and specific.
- ✅ No junction boxes were buried behind finishes.
- ✅ Panel working clearance is unobstructed.
Pro-level strategies that make inspections go smoother (and reduce “inspector questions”)
These aren’t code tricks. They’re “make your work auditable” habits.
1) Build an as-built circuit map (even a simple one)
A hand-drawn floor plan with circuit numbers and key loads is incredibly effective:
- It proves your labeling isn’t guesswork.
- It helps the inspector spot obvious inconsistencies before they become corrections.
- It helps future homeowners and electricians.
2) Use consistency as a safety tool
Pick consistent rules:
- Same type of box where possible.
- Same cable routing logic room-to-room.
- Same protection strategy (breaker-based vs device-based) where it makes sense.
Consistency reduces mistakes—and mistakes are what inspectors catch.
3) Pre-test before final (don’t “discover” problems with the inspector present)
Functional tests that often prevent embarrassment:
- GFCI test/reset and confirm protected downstream outlets.
- AFCI breaker behavior (no nuisance trip under normal loads).
- Polarity check on receptacles.
- Basic load sanity (e.g., kitchen circuits aren’t oddly shared).
4) Cleanliness is not cosmetic
If an inspector can’t see:
- they ask more questions,
- they look longer,
- and they find more issues.
A clean site is an inspection advantage.
Common SF house types and inspection pain points (and what to do about them)
Victorian / Edwardian plaster walls
Pain point: box depth and device mounting.
Fix: plan for box extensions and deep boxes; don’t force devices into shallow cavities.
Balloon framing and vertical chases
Pain point: penetrations create fire spread pathways.
Fix: include fireblocking restoration in scope when openings are created.
Layered remodels (multiple generations of wiring)
Pain point: “mystery” old conductors and junctions.
Fix: document abandonment; keep transitions accessible; avoid mixing new work into old unknown splices.
Garages and basements used as storage
Pain point: panel clearances get violated.
Fix: protect clearance area; treat it like a permanent “no storage zone.”
Quick Answers (At-a-Glance)
What inspections are required after a rewire in San Francisco?
San Francisco’s electrical code identifies a required Pre-Cover Inspection before wiring is concealed and a required Final Inspection after completion, plus other inspections as needed.
What is a “Green Tag” in SF electrical work?
SF code states it is unlawful to energize an electrical installation without a Certificate to Connect Current (Green Tag), which authorizes energizing the permitted installation.
What are the most common red flags after a knob-and-tube rewire?
Unclear abandonment of old wiring, splices outside boxes, overfilled boxes, missing cable protection, mixed neutrals/MWBC mistakes, missing/miswired GFCI/AFCI protection, and vague panel labeling.